|
BOSS DR 202 |
|
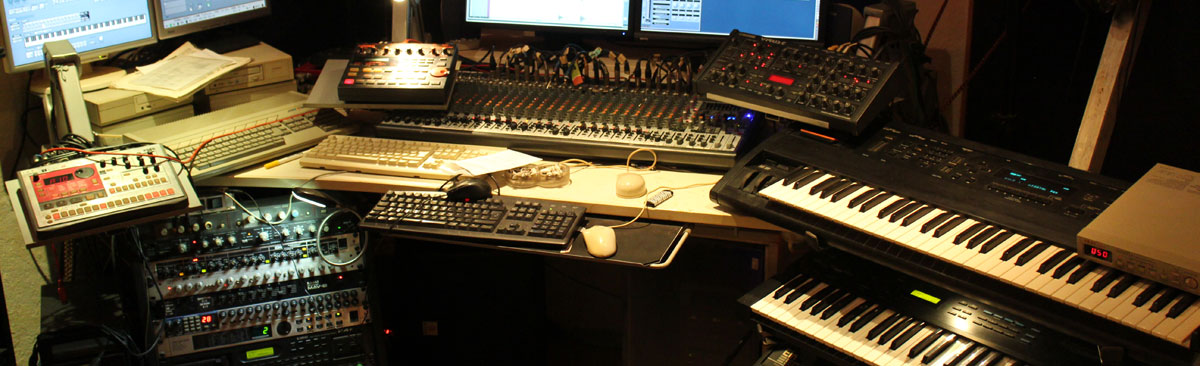
The StudioDue to this reason we mainly work with hardware. Here some of our stuff. |
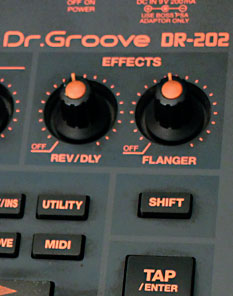 Our Drumcomputer, we don't use the internal sequencer. 256 Percussion instruments, 48 different basses, reverb and flanger, bass-boostfunction. Each instrument can be individually modified of pitch, release, cutoff, resonance and the addition of effects. TR 808, 909 are also available and kick named 99TECK that makes the 808 kicks look pale. The lable is BOSS but inside is ROLAND. Live a real cool device with whose bass-boost we made technicians a bit irritated on stage. More info about DR 202 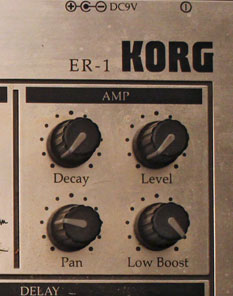 The legendary percussion synthesizer from Korg. At first glance, it is a simple device but with what makes the electronics musican's heart beat faster. Four instruments fully modifiable, open- & closed HH, crash and clap only in pitch, decay and lowboost modifiable and a delay. Internal stepsequencer, but we don't use it. Live a fantastic device, but don't expect cool snares. More info about Korg ER1 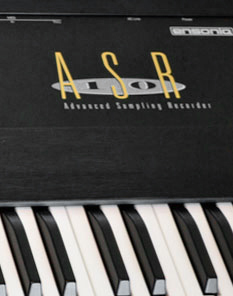 A legend in Hip Hop production. The ASR 10 is our masterkeyboard and sampler, but is only used as a sampler when we need this technology, some things are faster and more practical on the ASR 10 than in the computer and it sounds really great. RAM it has the max. possible 16 MB and the SCSI-Modul. Conected is a 500 MB SCSI harddrive with a fantastic sample library. More info about Ensoniq ASR10 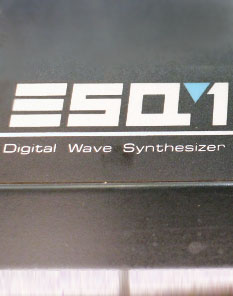
A completely underrated hybrid synthesizer with digital sound generation but an analog filter. Wrongly ill-reputed as cold. Due to its 4 envelopes and 3 LFOs, which are all individually routable, you can get the craziest and freaky sounds. The backup battery has been changed twice. More info about Ensoniq ESQ1 |
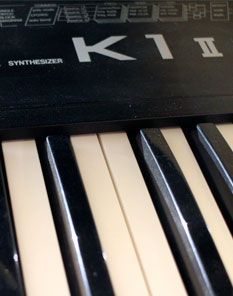
At first glance a cheap synthesizer, which is also true, but to put it briefly: It sounds so digital and raw, it's beautiful. Basically not a real synthesizer but a so-called romplayer. The sound is generated by PCM/Wave sounds stored in the memory, which can be combined by max. 4 samples/waves to one sound. Delay and reverb are also available, but which can be modified only marginally. Due to its concept, extraordinary FX sounds can be created. The backup battery has been changed once. More info about Kawai K1 II 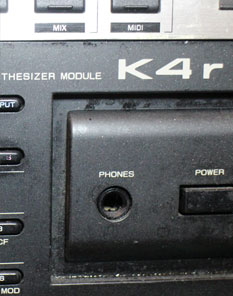
Here the rackmodule, no effects but 8 singleoutputs and a drumsection which can be controlled via its own midi channel. Also a romplayer. The sound is from ”Butter & Bread-Sounds” to insane freakness. The sound is generated as in the K1 but it sounds ”fatter” and has a lot more parameters for sound modification. If you want to make a joke you can load the factory sounds from Kawai, which begs the question of how it could be sold. The K4 only reveals its real possibilities by own sound design. More info about Kawai K4 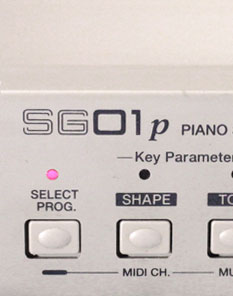
Just a pianomodule with classic pianos, e-pianos and clavinet the can be mixed with the internal reverb. Rather conservative, but sometimes we need it. Sounddemo Akai SG01p 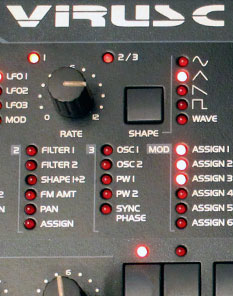
Who has one can consider themselves a lucky guy. VA-synthesizer with which you can start the freakshow. Over 700 sounds avaliable and if you don't find anything there, you can create whatever you can or can't imagine. Sounds from brutal to soft and warm to ”what kind of drugs do you use?”. The backup battery has been changed once. More info about Access Virus C |

Also a VA-synth which is nowhere near the capabilities of Virus C. But here the price / performance ratio is crucial. 2 banks with 100 factory presets, all modifiable, 2 banks with 100 free memory locations, all the necessary effects avaliable, the most important parameters are accessible by knobs. The only real weak is the display. More info about Novation A-Station 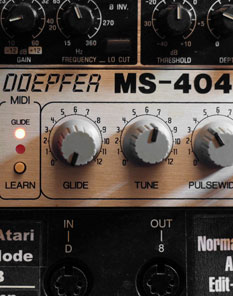
A real synthesizer which was conceived as a bass synth and it can do that very well. It is monophon, means chords can't be played. With a few clever adjustments, it can also be brought to ”talking ”. Sounds extremely warm. After years we had to recalibrate it once. More info about Doepfer MS 404 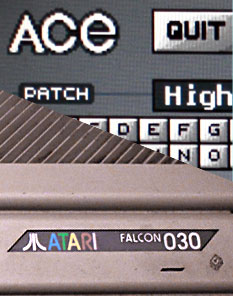
Don't confuse with the Atari ST. Until 2002 our sequencer with Cubase Audio Falcon 2.6. We produced on it 3 albums cause it can process audio via SCSI. Today we use it as a synthesizer with ACE MIDI which can use the capabilities of the build-in DSP. The sound can be described as ”weak or cheesy”, yes realy, but by ACE MIDIs step sequenzer and its unique sound it is the extraordinary element in the mix. A delicious device especially for chiptune sounds. (We have two of them.) Two Falcons with ACE MIDI sounds like that: The sound of Atari Falcon 030 with ACE Midi 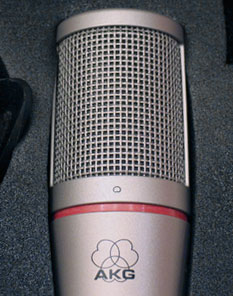
AKG c2000 B, AKG c1000 S, MXL 9000 |
Our
|
Our Workflow
The following is just an illustration of how we work and should not be regarded as a standard. It will be a little different with our colleagues in the partner studio, but there the conditions and challenges are different.
E.g. we never record a real drummer, so we don't have any
complex miking and no crosstalk.
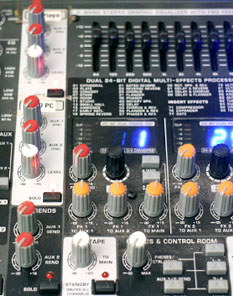
As is clear from the above listing, we work with hardware. Each track is first mixed on the mixer. Usually we don't equalize anything here, unless it is clear from the start that we do not need the frequencies of a sound below e.g. 500 Hz. Here we hear whether the sounds work together. What works on the hardware mixer also works well in the computer. All devices are controlled via midi from the sequencer respectively by the midisignal of the ASR10 (master keyboard.) If the track in the sequencer composed and arranged on midi basis, each track, including the drum sounds, is sent individually to the computer via subgroups. While this is one laborious way of working, but also has advantages. At pro level, this is done with multicore cables and enough audio inputs of the audio card, but what is also more expensive. Our audio card has only two inputs.
The individual tracks are recorded with the max. possible volume in order to gain the highest possible signal-to-noise ratio to the mixer's inherent noise, i.e.
we're basically destroying our entire mix, also the internal of the devices such as volume of high hats in the drum computer. We only record effects if we are absolutely
sure that this will not lead to problems later. Up until this point, we only consider the sequencer just as a tape machine.
This process takes about 1.5 to 2 hours, depending on the length of the track.
As disadvantageous as this way of working appears, it still has an unbeatable advantage. Since we hear each instrument individually over the entire length,
During this process, we determine in advance where problems can arise, which is helpful for a later downmix or equalizing.
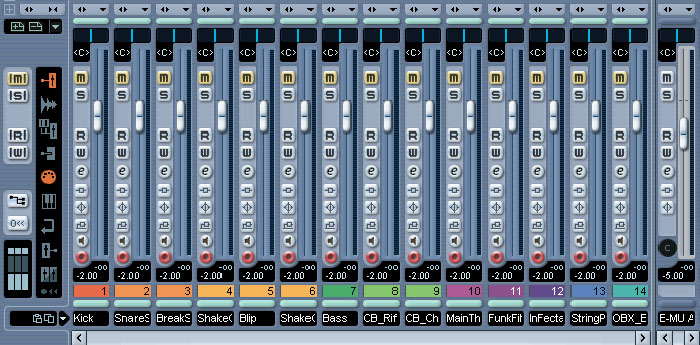
When the individual tracks are all recorded, we mute all tracks, group them and set the mixer volume of all tracks from 0dB to − 2 dB and the
masterout from 0 dB to − 5 dB. We'll need this headroom later. What we are definitely not do is to insert any compressor / multimaximizer or
limiter into the masterout at this point. This is gross crap, but we have seen it many times.
|
|
|
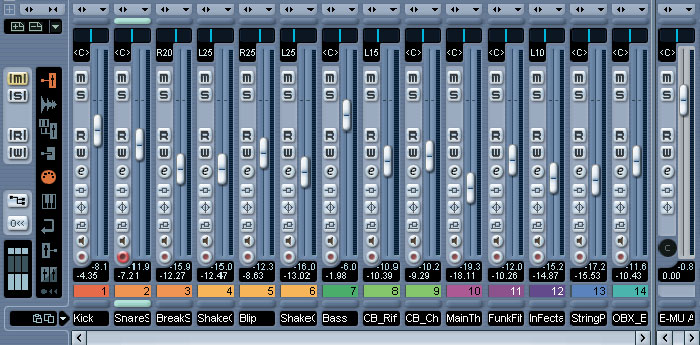
Then we break off the grouping,
unmute track by track, and adjust the volume of the tracks,
mostly in this order: kick, snare, HHs, other percussion, bass, main instrument and so on ...
Equalizing also begins from this step, but only with clear unnecessary frequencies and very discreetly or roughly.
At the same time we adjust the paning, especially the drums. Once the mix is up, we set the masterout to 0 dB
|
|
|
After this step has been completed, it becomes clear why we have reduced the volume in the mixer tracks and masterout.
Although the masterout is set at −5 dB, it can have a peak of −1.5 dB at this point, ie. we whould have
long overdriven by 3.5 dB in the masterout, it would be set to 0 dB at the beginning. This results from the volume summation, you know that from school,
if one child screams in the schoolyard, it is not loud, but if the whole school screams in the schoolyard during recess it is considerably louder. This process
is made automatically and dynamically in a purely DAW-based production, e.g. in Reason.
But we work with hardware sound generators
and first of all over the mixer. Now our mix is almost identical to what we had on the hardware mixer. If we now reach a peak of -3.5 dB on the masterout
we again group all tracks and regulate all tracks down so far that we are just below − 5 dB.
The other way around, if we have a peak of -5.5 dB in the masterout, we can set this to 0 dB without mixer readjustment.
If the masterout has a small headroom of −0.8 or −0.5 dB, this is even an advantage.
(These are not standard values but apply to our workflow and our studio setup.)
This procedure is also recommended in purely DAW-based production.
Now we start with equalizing the individual tracks and effects and only when we are finished and satisfied with this the so-called mastering tools appear.
Before we go to the downmix and premastering, we make a little excursion to humanizing as this relates to the TPL (True Peak Level) which becomes a topic in premastering.
|
Humanizing
The novice or inexperienced keyboardist tends to quantize, which is certainly helpful for beginners. Now, however, fact is that no
musician plays as precisely as a sequencer. Good drummers play with a time difference of about 16 milliseconds, (one second ≙ 1000 milliseconds).
Also, no musician always plays his instrument at the same volume.
Added to this is the term ”groove”, a good ”Groove” does not work with hard quantization.
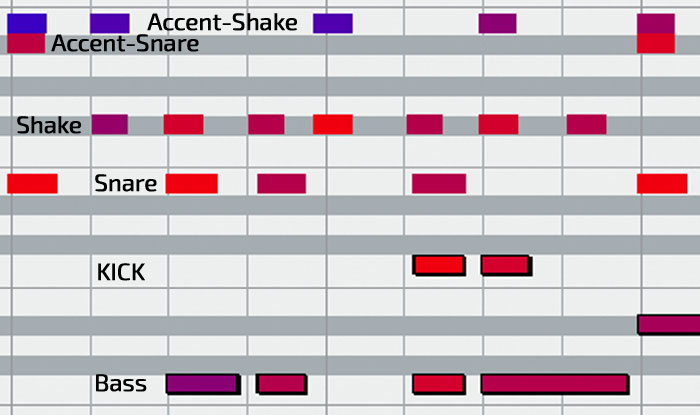
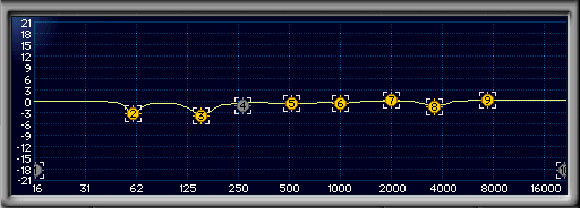
The example below shows, that the drum pattern is not exactly quantized, If we would quantize it, the ”groove” and the cool rolling of the
beats would be lost.
|
|
|
Here the beat without hard quantization. Here the beat with hard quantization to 16ths. |
More tricks in humanizing
We use two layered snares in almost all of our tracks, once the main snare and then a matching, quieter snare.
This has the real purpose of making the snare fatter. Of course you can add something else, it just has to fit!
We are now using the random function in our sequencer for position and velocity, at least it works only with midi in our sequencer.
We set the position for both snares to −3 & +3 milliseconds, and the velocity −5 & +5.
(These values are only guidelines, but should only be ”feelable” not “audible”).

|
Due to the random slight temporal shift and random volume differences, our snare never sounds exactly the same over the entire track.
The difference should be barely audible, rather noticeable.
With a piano pattern, on the other hand, we use the random function for position and note length. It is no coincidence that our drum machine
has a flanger effect on board. This effect has tiny fluctuations in pitch, So-called comb filter effect that makes the sound more dynamic,
we use it discreetly with high hats or snare. Or later as a plug-in in the sequencer.
We never apply this humanizing to the kick, maximum position with −1 & +1 millisecond. Are arpeggio patterns part of our track,
we do not apply any humanizing to these and leave them hard quantized. Which is another possibility, but one that is more part of the arrangement,
are volume differences with the automation of the sequencer.
These measures now make our track livelier and more natural, but can lead to the problem in premastering with regard to TPL (True Peak Level).
Make as much as possible to record yourself and repeats / copies (midi), e.g. piano pattern modify them a little.
Which doesn't really belong to the humanizig, but what should be mentioned here is creating your own sounds to achieve your own sound aesthetic.
In return, if a preset fits, then it just fits.
We mostly work with a 50/50 mixture.
|
Downmix & Premastering |
Historically, basically everything that comes out of a studio is premastering, the actual mastering takes place in the manufacturing plant provided that one
releases on CD or vinyl. There are incredible rumours surrounding about mastering, but you should consider that the people who do / can do something like that they just
put their pants on like everybody else, one leg at a time. We strongly advise against so-called online mastering.
If you can't master by yourself or if you don't trust yourself, look for someone with
whom you can speak personally and, best of all, compare the result with your recording in his studio. Make sure in advance if the one
has enough experience in your music genre, because it can be fatal to have a dubstep album mastered by someone who only masters Alternative Rock and
Speedmetal. Of course there are very good mastering technicians who can master almost anything, but since they are very good, they are also very expensive.
|
|
|
Mastering doesn't make a prince out of a frog, but it can turn a prince into a king. Mastering isn't just about being the loudest.
Mastering is the art of compromise because there is no such thing as the perfect mix. Mastering tries to make your track sound good on the 2300- USD Nubert speakers,
the car speakers and the 25, - bucks cheap PC bowls.
It is also important to understand that e.g. Hardcore Metal sets the focus differently than Hip Hop in terms of mastering. And, very importantly, mastering doesn't make a hit.
More on that later.
Which skills are necessary for mastering?
A. Theoretical basics, not many but a few. B: Listening carefully, patience and common sense. C: The right tools. D.: Master at least 4 tracks or entire albums. Mastering tracks individually is a. penuts and b. you don't learn anything. Before we go any further, a little excursion into the technical part. |
|
|
TPL were not an issue until the invention of the mp3 and digital music production. Since, however, when converting from a WAV / AIFF to mp3, the mp3 has higher peaks.
Tracks they have peak to -0.2 dB as WAV / AIFF are overdriven as mp3, which turns out to dirty sound or distortion. We always master to -1 dB.
Measurement methods from the analogue world used for digital audio processing also proved to be inadequate.
You can then see in a good loudness analyzer, that although the limiter is set to −1 dB, the TPL can reach at −0.8 even up to −0.4 dB,
i.e. with an amplitude of -0.2 dB we would be exactly at 0 dB or even above. These ”TPL peaks” arise by humanizing,
phaser / flanger, reverb, delays are used in the sequencer / DAW. But also by the converter of the audio card because here we have to go back to the analog world.
The theoretical basics of why TPL occur are far more comprehensive, but this information should be sufficient for now.
|
|
|
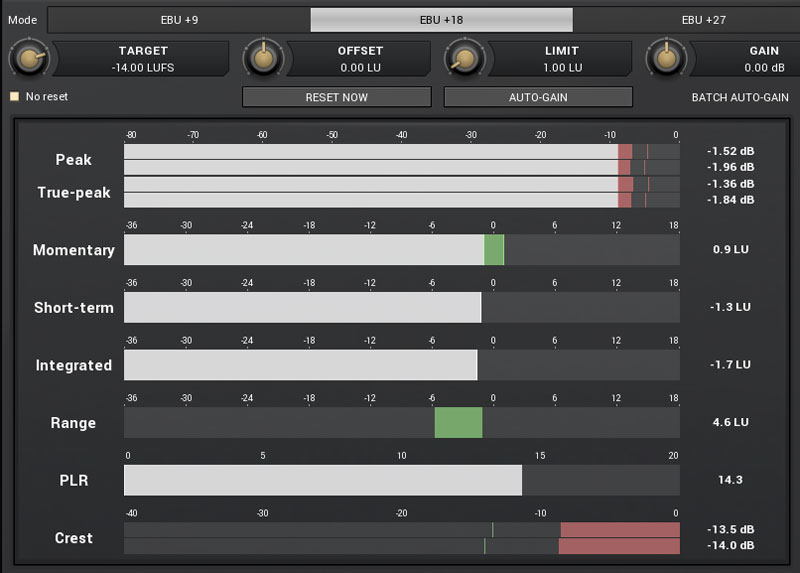
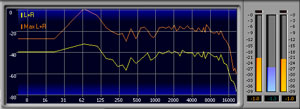
The display of Integrated and True-peak (TPL) is essential, we have set the target to -14 LUFS (top left). The nice thing about this analyzer is,
that we can see how far we are from Integrated 0 (our target, −14 LUFS). Free analyzer, available here:
Melda Productions
|
|
To get the TPL under control you need an extremely fast limiter. We use the ” Limiter6 ” which has a so-called protection function.
We only use it during mastering but not yet in premastering. Available for free here:
Limiter 6
|

|
|
|
To understand LUFS the following example: You stand in front of a wall with a door, behind it is an A380 with the engines fully turned on.
You open the door for approx. 0.5 second, OK that was loud. Then you open the door for 4 seconds, OK, it wasn't just loud, it was violent.
Whether the door is open for 0.5 or 4 seconds, the A380 will always produce 120dB, LUFS measures how long the door is open.
For music you should work with -14 LUFS, especially if you want to offer your tracks on streaming services like Spotify, Apple iTunes, etc..
In this case you should not go below −14 LUFS, because loud tracks are regulated more quietly, but a quiet track is not made louder.
There are of course exceptions; Beatport even allows up to −8 LUFS and Bandcamp has no regulation at all. For this reason
we always create a version for Bandcamp, which we don't mix down separately, but a copy of the master track simply increased by ”normalizing”
to −0.5 dB. At Bandcamp, we don't worry about TPL, since most buy WAV / AIFF files rather than mp3 and we already got the TPL under control in
the mastering.
|
|
Which tools are necessary for ... Premastering
|
|
|
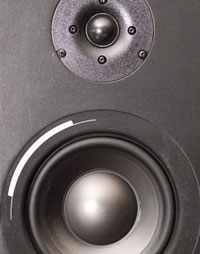
Passive, our main speaker, very natural and with a pleasant frequency range.
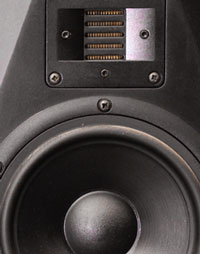
Passive, to match the Alesis. If it sounds the same on both and only the difference between the speakers can be heard, we're close.
Extremely precise, fantastic in treble range, a little too powerful in the bass.
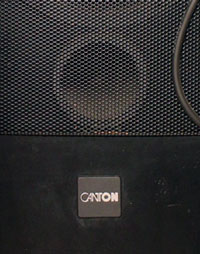
Only used at the end of the mastering. 25 Hz to 21kHz. Essentially used to check the bass range as their bass is ”awesome”.
|
|
We do not recommend mastering or even doing the downmix on headphones, because something essential is missing here, namely air. Keep in mind, sound is basically an illusion that only arises in the brain, what we are actually hear is ”swinging air-waves”! (Already spacy if you think about it!) There are producers who do good mixes also on headphones, but they usually have many years of experience and know what they do. |
|
|
|
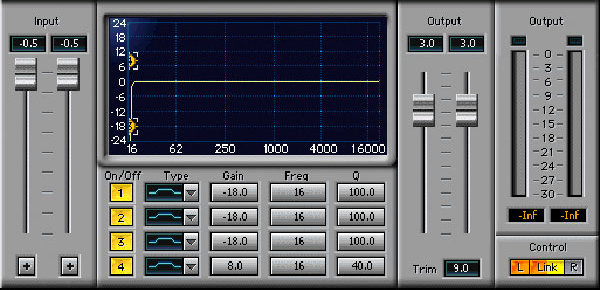
At ”Insert 1” we put a 6-way EQ with which we radically remove everything below 20 Hz. We use a modified supernotch for this.
The reason is that anything below 20 Hz are unnecessary signals on speakers they cannot be heard. In extreme cases, this can affect the deep bass range
in such a positive influence that the kick and bass become more precise and powerful. This is because the signals below 20 Hz have no effect on the human
ear but still trigger the membrane of the bass speaker in an unnecessary way so that they negatively influence the response time of the basspeaker membrane and the
power for the frequencies above. We use the two free EQs to adjust, very gently with a very low Q value (3 - 7), a ”basic correction”
to max:. + 1 / − 1dB.

|
|
At ”Insert 2” we put a 4-way EQ with a supernotch at − 46 dB in order to empty the low-end range to the dregs.
We cannot officially confirm whether this is really necessary, but we do the same as with the beer after the ”last beer”, we are already
totally stoned, but it's just so funny. We keep everything free up to the last 3 inserts, we may still need any more plugs e.g. effects.
|
|
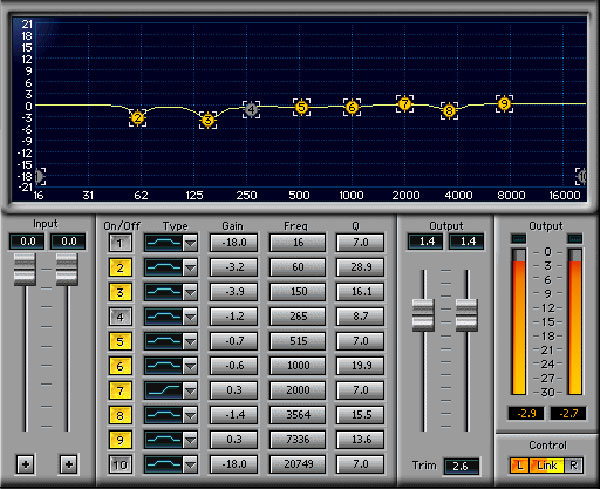
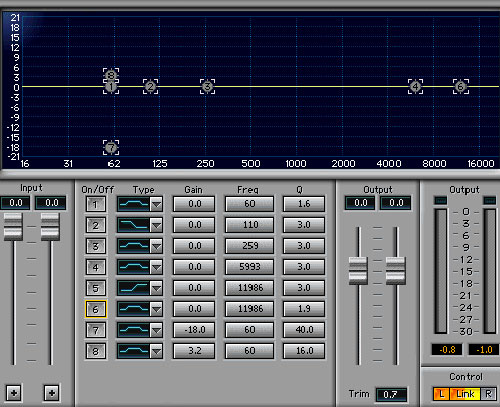
Our actual mastering EQ comes on the first of the last 3 inserts. Here with the settings of the currently to be edited
track.
|
|
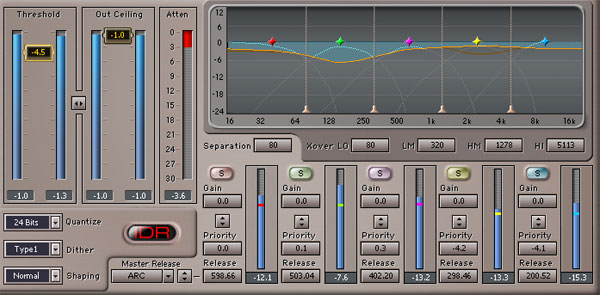
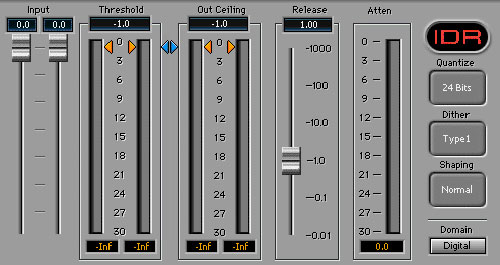
Our maximizer goes to the next-to-last insert and our loudness analyzer goes on the last insert, both remain deactivated.
We set the maximizers compression to −3 dB, the limit to -1 dB and the separation to 80. The value of compression will change while we go on in the
mastering process, but it is a good starting point / experience. The quantize value in the maximizer must also be observed, here
set to 24 bit because we would like to continue working in high quality later.

|
|
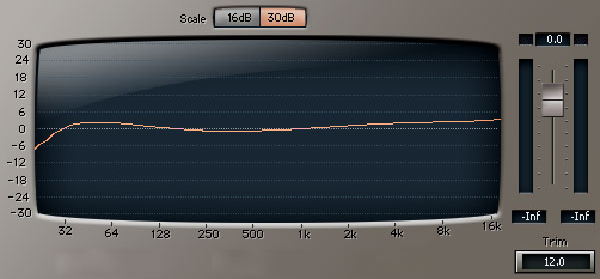
When the EQing is satisfactory, we plug in ready-made mastering curves into one of the free inserts before of our mastering EQ.
We always load 2 different ones in order to be able to make an A / B comparison. The curve can be switched to 16 or 30 dB.
The one that comes closer to our desired end result is used.
This is done for the reason that EQing only addresses the ”problem areas ” e.g. resonances or other but does not regulate the overall sound, we
don't want to make problems loud, but rather the good parts of the track. However, this is not always necessary, sometimes the tracks are so perfect
that this is superfluous or counterproductive. You can create such curves yourself in the EQ and save them as a preset.
Usually our track gets a little louder again, especially in the bass and treble range.
|
|
Now we switch on the maximizer and the loudness analyzer. Now we actually get louder and the sound thickens which leads to the fact that we hear frequencies more
clearly and adjust accordingly in the mastering EQ. Incidentally, we lower the masterfader on our hardware mixer.
We have also increased the compression in the maximizer from −3dB to −4.5 dB, since with −3dB we have not yet reached the integrated value 0 (our target −14 LUFS).
|
|
At this point take a look at our master fader of the hardware mixer in the course
of the work process. (We always stay at a moderate working volume. Average values) |
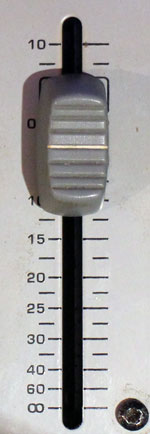
Setting of the master fader on the mixer when we only work on the mixer via the hardware. This results from the ”quietest” device
in our setup, this is the Kawai K1 II to which the mixers mix has to be set.
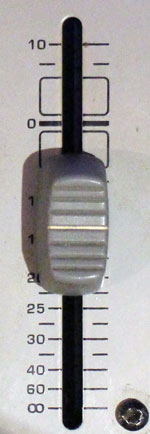
Setting of the master fader on the mixer after everything has been recorded and get out of the computer. We have recorded everything with almost 0 dB and therefore we have
now more scope.
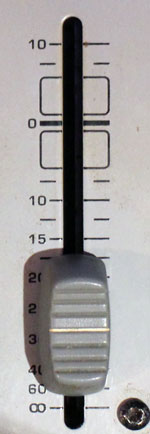
Setting of the master fader on the mixer after EQing and activating the maximizer
|
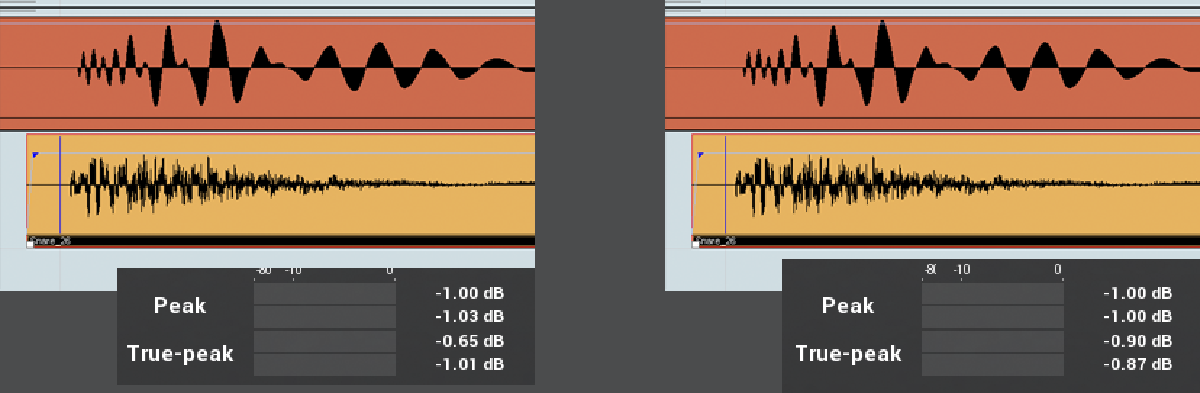
If the sound corresponds to what we imagine we observe the LUFS and the TPL. It is always important to reset the analyzer and
to run through completely because the -14 LUFS we want cannot be reached over the entire track, sometimes even in the last 30 seconds.
Based on the LUFS, we see how loud we can still get or how much compression can be added in the maximizer or has to be removed. I recommend
to go into the maximizer as loudly as possible with the mastering EQ that is pluged before.
If the analyzer does not show TPL values over −0.8 / − 0.75 dB we don't need to worry about it, We'll do that later with our
limiter in the final mastering. If our analyzer shows higher TPL values, we have to localize them because even very fast limiters have their limits.
To do this, we let the track run and stop at the point when the peak occurs (Reset the analyzer). Often the waveform shows which is the ”culprit”.
Either you mute the track or cut out the part and mute only the cuted part, rewind a bit and watch the TPL.
If the TPL value no longer appears, the ”culprit” is found.
|
|
|
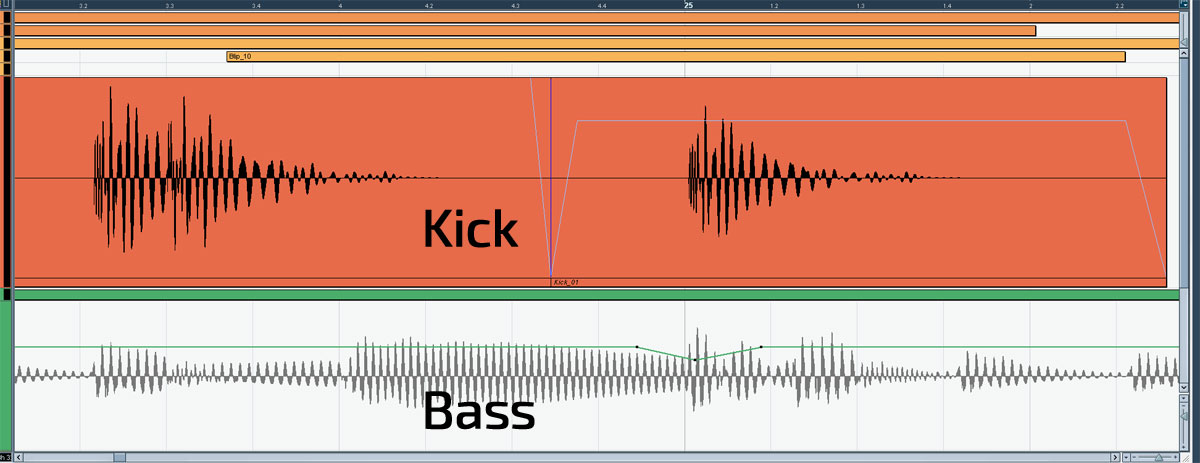 Here, kick & bass produces a too high TPL peak. Volume of the kick with part volume and bass with automation lowered. |
Do we have our ”TPL candidates” localized, we only lower the volume of the parts they have been cut out, so that the too high TPL peak no longer
occurs. This is usually such a little that it does not have an audible effect. If no part can be created by cutting because the note is too long or the notes
flow into each other, we use the volume automation. If the high TPL values always appear in the same place this can be caused by the humanizig of any instrument,
mostly a drum sound, which is too loud at one point. Sometimes 3 or more sounds can produce jointly the high TPL value, this is due to this, that the
instruments through humanizing (live play) or the arrangement with their peak so ”unfavorable” are on top of each other that they jointly generate the TPL value.
This method is certainly quite complex and time-consuming, but we think this is more discrete than simply to nuke it down with a compressor / limiter.
If the high TPL value always occurs in different places, it is caused by dynamic effects such as phaser / flanger or reverb also modulated
delays as insert effects of the DAW. In such a case you should try to reduce the amount of added effects. Only if this does not lead to success
you can try it with a compressor or limiter on the corresponding track.
|
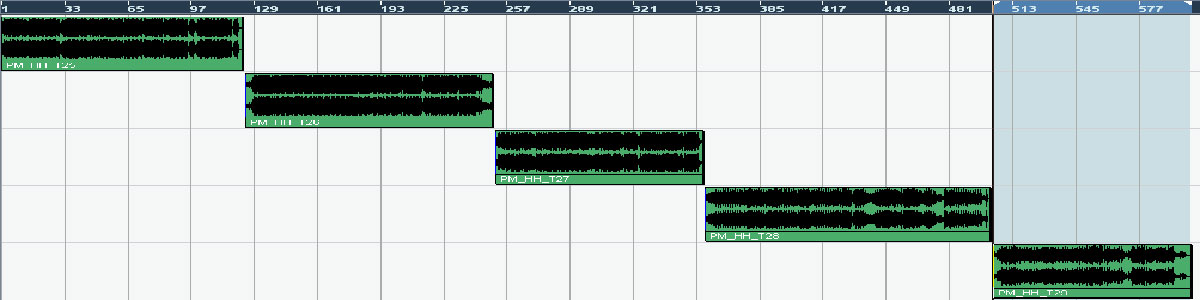
 Here, the snare was pushed forward a few milliseconds so that it sounds earlier. |
In cases where the method of volume reduction proves to be "persistent" and
does not lead to a reasonable result or Intervention becomes audible, we move
the cause by a few milliseconds. To do this, however, you have to zoom deep into
the track, because it should only be milliseconds, a value of e.g. one /64th is already
too much! TPL values up to -0.75 can be used by our limiter be intercepted later in final mastering,
i.e. it is neither necessary nor sensible to "fight" for values of -1dB!
IMPORTANT: We always remove TPL values only when our master is "finished", this should be the final work.
We also use this method to remove "unnecessary" peaks in the last EQ of our mastering chain before the
multimaximizer and even before we even think about the TPL! If our track has an average, say at -1.6 dB but
has a peak of -0.3 dB 4-5 times, we manually reduce these "outliers". Removing these peaks gives us the opportunity,
in this example, to go about 1.2 dB louder into the maximizer and reduce the compression there accordingly. Our philosophy is:
as loud as possible, as little compression as possible. It is also important to understand: high peaks in the EQ do not necessarily
have to generate high TPL values!
|
 With these settings, the flanger generated too high TPL values. 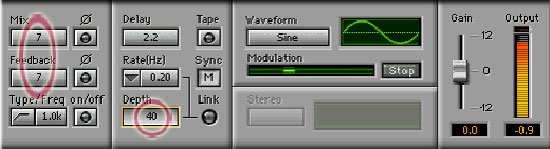 After lowering mix, feedback & depth, the TPL values were OK. |
|
 In each track, now we load in the next-to-last ”insert” an 8-way EQ, if your EQ offers a preset for mastering load it and a maximizer in the last ”insert”, but a very simple one, set the compression to −1 dB and the limit also to −1 dB. (The maximizer does not yet get a ”grip”, because our track is already limited to −1 dB, that's how we want it!) |
 Do we deliver trackouts / beats for sale or for further processing for e.g. videos, let's leave the quantize value at 24 bits, since we want high quality trackouts / beats. However, are these final tracks e.g. of an album we set Quantize to 16 bits. |
In the masterout on the next-to-last ”Insert” we load an extremely fast limiter, in our case the Limiter6 (we switch
everything off in the Limiter6 and only the ”protection” at −-0.7dB on), analogous to this a ”very fast” limiter of your choice, and on the
last ”insert ” our loudness analyzer. On a free ”insert” before the limiter we put a frequency analyzer, possibly do we need one.
Eq-ing will again create TPL, we let it "through" up to -0.7 dB. It keeps in the middle and treble more dynamism.
|
 Analyzer before the limiter (master-out) 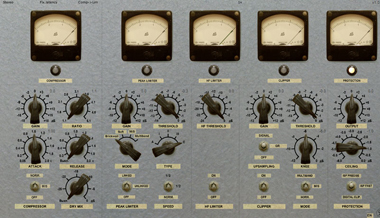 Limiter, before the loudness analyzer (master-out)  Loudness analyzer, last insert (master-out) |
Now we try to create a certain uniformity in our ”album ” with the individual track EQs. It is possible that we have to rise the compression in the track maximizers,
due of the equalizing in the track EQs. (Watch the LUFS.) We have made ourselves a principle. especially for albums with several
Tracks, better to achieve a healthy average than 3 super tracks and the fourth then drops compared to the first three tracks. Reason applies here
to let go.(steady sound experience over the entire ”album”)
We are very careful with the EQs here. Increase little or lower it better and low Q-values. In addition the following: In a conversation with a
mastering technician he said, that it can be serious in mastering whether you raise something 0.2 dB or lower 0.2 dB. At the time of this conversation
that seemed unlikely to me. After many years of experience, however, I can only agree with this technician. I.e. −0.5 or −0.7 dB can be serious.
Despite that, we shouldn't shy away from ”drastic” intervene when it is necessary.
|
|
 Premastering 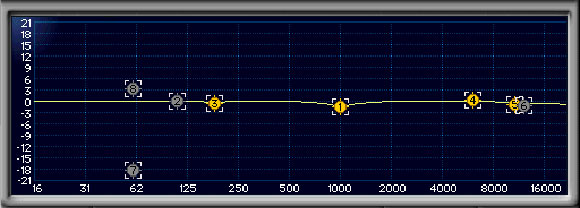 Mastering |
If we hardly find any differences in the sound, or get a ”stady” sound of the entire ”album” our mastering is finished.
The best way to test this is, let the entire ”album ” run in the background during an activity that is not related to the music.
And don't forget one thing; there is no such thing as perfect mastering, nor we should read too much into things. Compromises
you always have to do, even if they are small. Which is also a good test: Let the album run at normal volume in the background,
during a conversation. Beginners can also load a “reference track ” into the project, earlier we had
done that, today we no longer consider it necessary. Listen to your tracks on different speakers if this is possible.
I would also like to comment on LUFS and TPL. LUFS are more from the bass and long ”carrying” passages generated and TPL rather through percussives and treble.
We produce Hip Hop-Beats and Reggae/Dub, at Rock or some like that it can be a bit different, but that you get by experience. Exceptions confirm here course the rule.
|
|
 A very short reverb with very little admixture in front of the master EQ, only noticeable, should not be audible if the track does not develop a ”grip”.  Thrillseeker, a so-called exiter, only slightly before the master EQ. ”greases” the track, makes sense for tracks that are somehow ”sterile”, but is very quickly overdosed. It is available in 2 versions, we mostly use the "blue" one, (read the Read me.txt!) Here the Download. |
|
The disadvantage of midi is obvious. You have to play the show yourself.
(You can also use the mouse, but only dabblers do it in this way.) However, what is a virtue of midi is the neutrality of midi.
This becomes evident when looking for the right sound, or; what happens if you set the midi track to a sound that is not suitable for it?
Arranging is also much easier with midi than with audio material.
Which is very beneficial, the very easy changing of note lengths and pitches, or transposing with midi which is never completely without some degree of destruction
of audio material. Even the ”slicing” in Reason or ”timestreching” has its limits.
Of course, samples also make sense, but shouldn't be the main part of a track, cause it can lead to trouble in the worst case.
But they can often enrich a track. The question here is how creative you are with samples and what you are sampling.
Should the sampling replace musical skills there will be no real success and satisfaction.
|
|
Here are a few words about the studio. The fact that you can usually not be particularly selective is unfortunately an undisputed fact since Mozart.
Still a few lines about it. I believe that a small studio is always preferable to a large one. I mainly justify this with the reverb times. Long reverb times can
have a very annoying effect, especially when working with microphones but also on the monitoring.
Here are a few tips to reduce the reverberation of a room. Plain surfaces reflect sound more than rough surfaces, (Anyone who knows Beat Box knows it of the bathroom, hardly anywhere
it sounds as cool as in the bathroom, but if you would record it there you would have a number of problems with the tiles); straight surfaces reflect more directly than inclined.
In order to get a grip on unfavorable sound conditions, one can plunge into unbelievable costs, therefore here some cheap alternatives.
In my opinion, what belongs in every studio is a couch, if possible maybe even two. A top bass absorber and comfortable too.
Walls covered with theater curtain ( Molleton) to take away the reflection, also mattresses are ideal for this (ask grandpa & grandma whether
they still have one or two in the basement.) or the really stupid: „tapestry”. Shelves with books not only look chic and give the impression of being highly educated,
but are excellent sound absorbers. (You don't have to be a catholic to use 25 bibles as absorbers! God excuses this!)
With the floor it is inevitably a little expensive but you can do it yourself.
We have a double floor in our studio, although the meaning is different, we are in the basement, so on the foundation of the house, here is more the coldness a
problem but if you have a little manual dexterity, you can do something yourself with funds from the hardware store. We built a scaffolding about 20 cm high,
filled with perlite (artificial volcanic rock), alternatively rock wool but only for completely dry rooms, and then closed it with OSB panels (1 cm thick particle board).
So that it looks a little more elegant finished with laminate. Highly recommended if Mr. & Mrs. Meyers at the 2nd floor, repeatedly asked you to produce classical music and not all the time
Drum & Bass. For whom that is too extreme, carpets, as thick as possible, but have less effect on the bass.
With all these measures, however, you shouldn't kill the reverberation at all and the infamous egg cartons are absolutely useless.
|
|
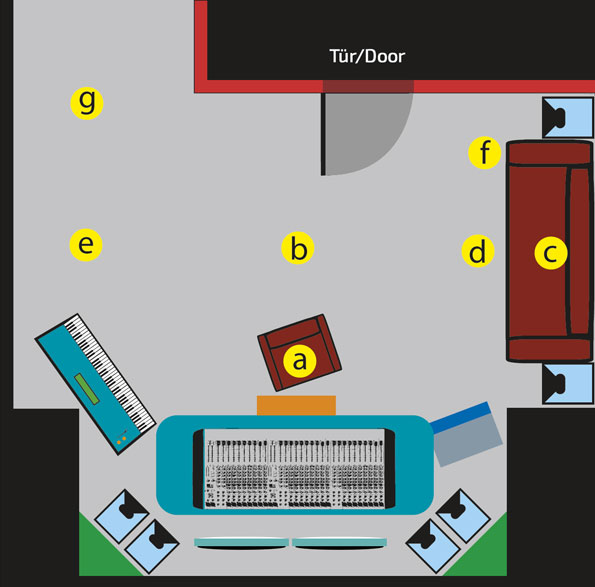
a. This is the so-called sweet spot, here the stereo image of the monitorspeakers and also the distance to the Cantons (R & L next to couch) is perfect.
b. Optimal position to the Cantons, stereo image and bass. c. If you lean back on the couch you sit in a "mid range hole" and hear mostly bass from the monitor speakers. Of the Cantons we hear ”only” bass. d. If you lean forward on the edge of the chouch you are out of the ” mid range hole ” of the monitor speakers. We don't hear the Cantos correctly because we are sitting facing away of them. e. Here is the standing wave of the Cantons, too much bass f. Standing wave of monitor speakers, anyone who needs it like a D & B club should sit on the armrest. Endless bass. g. Also standing wave, to which the recess acts like a loudspeaker housing, in reality it has more depth as shown at the graphic. Here, at the appropriate volume, the bass can be felt almost physically. A keyboard shelf is mounted on the table (orange), otherwise we would sit too close to the monitor speaker and thereby in a bass hole. The red line marks a wall with which we have separated the front part of the basement room, because the heating system is in front of it. Depth approx. 30 cm, a scaffold made of wood, filled with rock wool and closed with OSB panels / pressboard. Behind the monitor speakers are acoustic absorbers, (green), also filled with rock wool and closed with molton / theater curtain. Note: Never are all speakers running at the same time, it would be ”insane” and results in an incredible ”psychedelic” surround sound! |
|
Because making music can be a very costly affair I would like to refer to Ubuntu Studio here. It is based on Linux and brings
software worth several thousand euros with. Via the ”Software Center” a lot can be installed additionally. Unfortunately, many still believe
the misconception about Linux would be complicated, however, this is utterly wrong. Even if you can't work without Windows, it can be installed parallel
to Windows.
Get it here:

|
|